

Continuous Compliance in the Microsoft Cloud
A TechAxia Whitepaper on Automating CMMC CA.L2-3.12.3 (Continuous Monitoring)
Author: John Igbokwe, CISSP, CCA, MCT
TechAxia Cybersecurity Compliance Solutions
Executive Summary
This whitepaper outlines how defense contractors and organizations using Microsoft 365 can meet the CMMC Level 2 requirement CA.L2-3.12.3 (Security Control Monitoring) through an automated, policy-as-code approach. By leveraging Microsoft Entra ID Security Config Analyzer (EIDSCA), CISA’s SCuBA baselines, and Azure Automation, organizations can establish continuous validation of their M365 tenant security controls.
Continuous Monitoring (ConMon) provides real-time assurance that security controls remain effective amid constant changes in cloud configurations, personnel, and regulatory updates. This automation enables compliance evidence collection, reduces manual audit workloads, and strengthens the organization’s security posture.
Business Benefits of Continuous Monitoring
Reduced Audit Preparation Time: Automates evidence collection and decreases manual audit effort.
Ongoing Compliance Assurance: Validates M365 configurations against CMMC and CISA baselines in real time.
Proactive Risk Detection: Identifies misconfigurations and control drift before they lead to compliance findings.
Scalable and Repeatable Process: Enables uniform monitoring across multiple tenants or business units.
Assessor-Ready Reporting: Produces clear, timestamped reports aligned to CMMC practice CA.L2-3.12.3.
Understanding Continuous Monitoring for M365
NIST 800-137 defines Information Security Continuous Monitoring (ISCM) as the ongoing awareness of information security, vulnerabilities, and threats to support risk management decisions. For CMMC compliance, this means maintaining oversight of all assets — including Microsoft 365 — to ensure configuration and control effectiveness.
Because Microsoft 365 environments contain thousands of potential configuration combinations, many only available via PowerShell or Graph API, automation is essential. TechAxia’s approach defines security policies as code and implements recurring validation using Microsoft’s EIDSCA and CISA SCuBA baselines.
An Example of a Continuous Monitoring Output Report

An example of continuous monitoring
Implementation Framework
The following framework outlines the step-by-step process for automating continuous monitoring within M365: (see appendix below for code snippets)
1. Set up Entra ID Security Config Analyzer (EIDSCA) for baseline validation.
2. Integrate CISA SCuBA Tests for alignment with federal standards.
3. Deploy Azure Automation Runbook to execute monthly ConMon checks.
4. Assign Managed Identity Permissions to securely authenticate against Microsoft Graph.
5. Schedule and Monitor Reports to maintain evidence of continuous compliance.
Visual Flow Diagrams
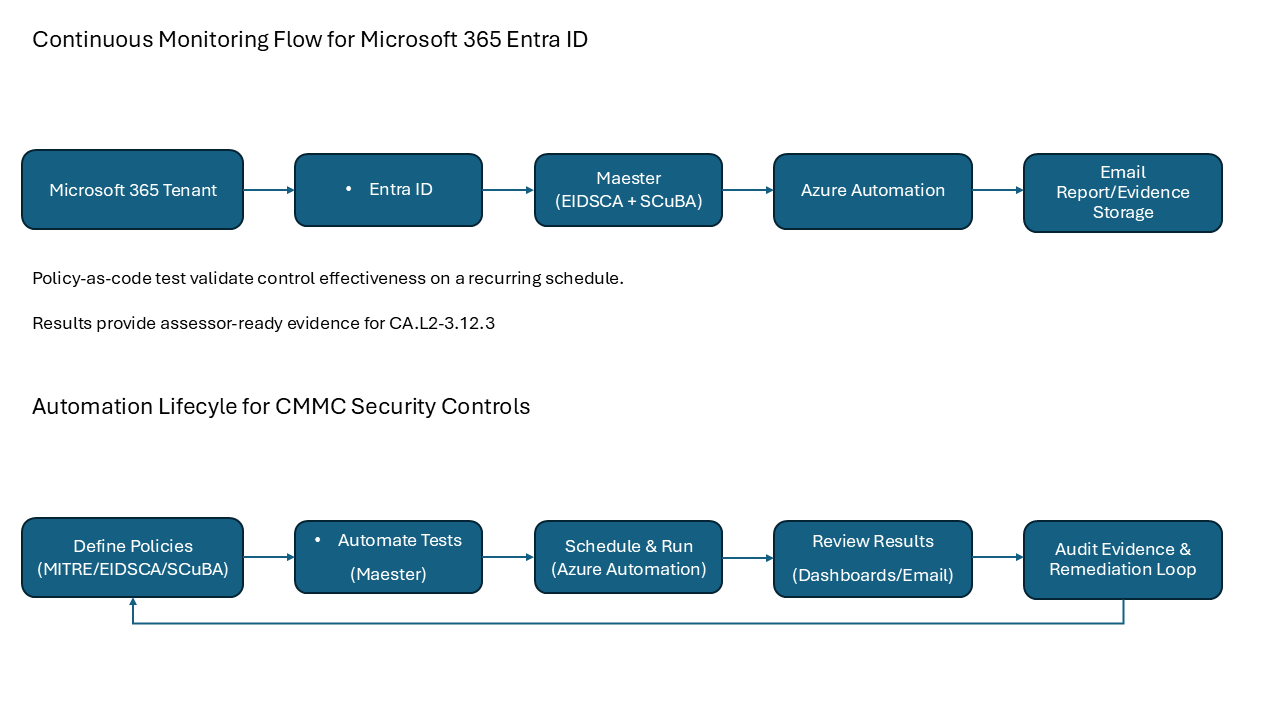
Visual Flow Diagram
Conclusion
Automating Continuous Monitoring within Microsoft 365 not only satisfies the CMMC CA.L2-3.12.3 requirement but also enables proactive cybersecurity management. TechAxia’s implementation approach helps organizations move beyond checklist compliance toward sustained security resilience.
About TechAxia
TechAxia is a cybersecurity compliance firm specializing in helping defense contractors achieve and maintain CMMC compliance using Microsoft 365 and Azure GCC High. Our experts deliver scalable, automated compliance solutions that align technical controls with business goals.
Appendix: PowerShell Code Snippets
These code listings accompany the implementation steps for Continuous Monitoring of Microsoft 365 security controls (EIDSCA, SCuBA, Azure Automation). Replace placeholders (e.g., user principal names, mail recipients) with values appropriate for your tenant.
A. EIDSCA Tests (without CISA SCuBA)
#Install test framework and Maester
Install-Module Pester -SkipPublisherCheck -Force -Scope CurrentUser
Install-Module Maester -Scope CurrentUser

#Prepare test workspace
md maester-tests
cd maester-tests

#Allow local script execution for current user
Set-ExecutionPolicy Unrestricted -Scope CurrentUser

#Import and install Maester tests
Import-Module Maester
Install-MaesterTests
B. EIDSCA with CISA SCuBA Baselines
# Install Azure and Exchange modules (if needed)
Install-Module Az -Scope CurrentUser
Install-Module ExchangeOnlineManagement -Scope CurrentUser

# Connect to Microsoft Graph, Azure and Exchange (All services)
Connect-Maester -Service All

# (Recommended for GCC High) Connect individually as needed:
# Connect-AzAccount
Connect-ExchangeOnline -UserPrincipalName <admin@yourtenant.onmicrosoft.com>

# Run tests
Connect-Maester
Invoke-Maester
C. Assign Graph Permissions to Automation Account Managed Identity
# Replace with your Automation Account name
$managedIdentityName = "Maester-Automation-Account"

# Connect to Microsoft Graph with appropriate scopes
Connect-MgGraph -Scopes Application.Read.All, AppRoleAssignment.ReadWrite.All

# Retrieve required permission scopes (add -SendMail and/or -Privileged if needed)
$permissions = Get-MtGraphScope  # -SendMail -Privileged

# Get Service Principal for the managed identity
$managedIdentity = (Get-MgServicePrincipal -Filter "DisplayName eq '$managedIdentityName'")
$managedIdentityId = $managedIdentity.Id

# Get Graph App Roles that match required permissions
$graphSp = Get-MgServicePrincipal -Filter "AppId eq '00000003-0000-0000-c000-000000000000'"
$getPerms = $graphSp.AppRoles | Where-Object { $_.Value -in $permissions }
$graphAppId = $graphSp.Id

# Assign App Role(s) to the managed identity
foreach ($perm in $getPerms) {
    New-MgServicePrincipalAppRoleAssignment -ServicePrincipalId $managedIdentityId `
        -PrincipalId $managedIdentityId -ResourceId $graphAppId -AppRoleId $perm.Id
}
D. Azure Automation Runbook (Monthly ConMon Report)
# Authenticate to Microsoft Graph using the Automation Account's Managed Identity
Connect-MgGraph -Identity

# Define mail recipient/sender (must be a valid mailbox in your tenant)
$MailRecipient = "<security@yourtenant.com>"

# Create an output folder and filename
$date = (Get-Date).ToString("yyyyMMdd-HHmm")
$FileName = "MaesterReport" + $date + ".zip"
$TempOutputFolder = $env:TEMP + $date

if (!(Test-Path $TempOutputFolder -PathType Container)) {
    New-Item -ItemType Directory -Force -Path $TempOutputFolder | Out-Null
}

# Run Maester report
cd $env:TEMP
md maester-tests -ErrorAction SilentlyContinue | Out-Null
cd maester-tests

Install-MaesterTests .\tests
Invoke-Maester -MailUserId $MailRecipient -MailRecipient $MailRecipient -OutputFolder $TempOutputFolder
E. Scheduling Notes
In Azure Automation, create a recurring schedule (e.g., last day of each month) and link it to the runbook.